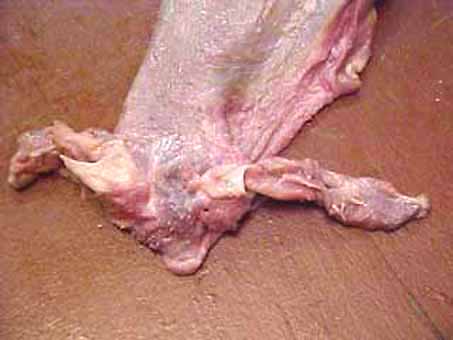
The pickled pad will be shaved down to the point that the black of the backside of the nose pad is showing through in a uniform fashion. The little pieces of cartilage on the nostril skin gets removed, and all the whitish/tannish stuff gets shaved off to the point where the black backside of the skin can be seen.
The length of the nostril skin is a matter of personal preference and an individual's finishing techniques. What has worked best for me is to carve out the nose on the form, install the septums, and then use Apoxy Sculpt to do inner nostril detail. I only leave about an 1/8" - 3/16" of hairless nostril skin to tuck. Once dry, I come back in and make the transition from skin to nostril detail with more Apoxy Sculpt, and finish.
Detail Fleshing of a Deer Nose and Nose Pad
by Glen Conley
If you've never fleshed a muzzle, upper lip, and nose pad before, you're going to find out real quick that this a pretty complex area! Don't panic. It all really will come off, and down to the skin. Use your STOP-ROT pay attention, and take your time. The object of the game is to get rid of everything that IS NOT SKIN.
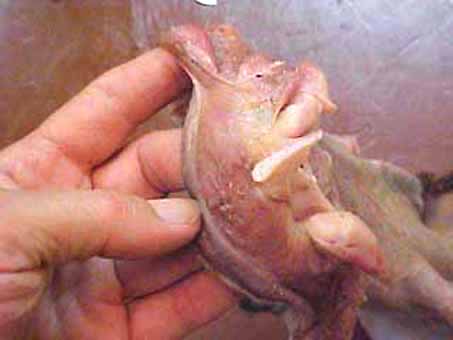
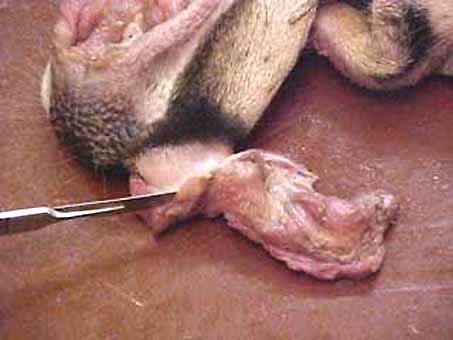
The first photo shows the nose after the deer has been caped out. You're going to need to start somewhere with your cuts so you can locate the skin. Off to one side of that strip of cartilage is as good a place as any.
Keep cutting and removing meat until you see the black of the nose pad starting to show. Now you have a point to go from.
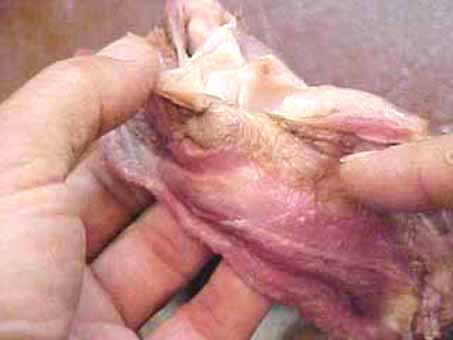
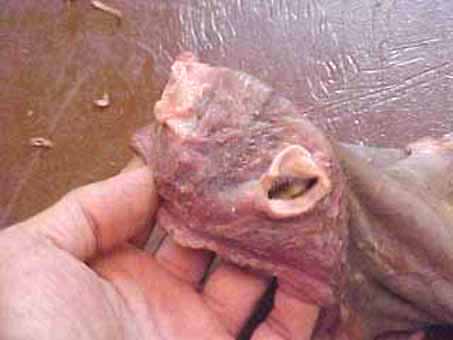
Below my finger is a gland pouch that lays over the upper lip, and goes along side of the muzzle. It's a pretty good size pouch.
Handle this in the same fashion as the rest of the detail fleshing. Get down to where you can see the skin, going between the pouch and skin with your cuts until the pouch can be separated from the muzzle.
To be sure of cutting it loose in the right place without screwing up something you don't want to screw up, bring the pouch out through the nostril opening, then cut it loose.
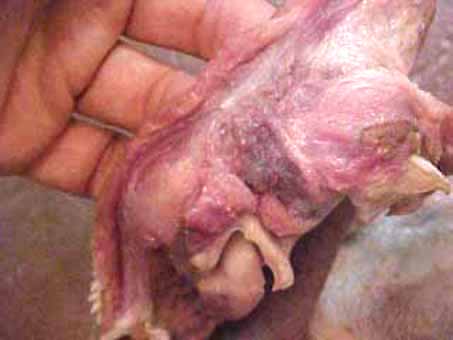
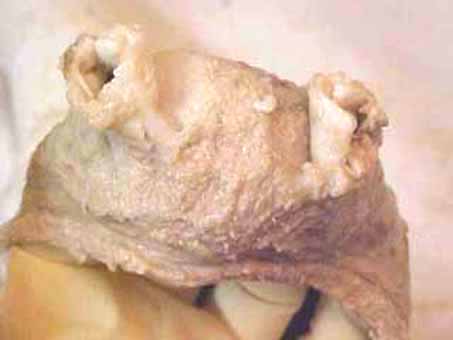
This will have the mass of the fleshing out of the way, and it will be easier to see the remaining bits and pieces of meat and cartilage. Get 'em gone.
I show a view of a fleshed pad ready for salting, and the next shot I have is of the same nose pad after two days in the pickle.
More detail fleshing information.
Caping a Deer l Remove Deer Ear Cartilage
Carving Nose, Pre-orbital Gland, and Set Ears on a REAL DEER FORM
WHITETAIL DESIGNER SYSTEMS, INC.
Has made another expansion! WEB SITE SERVICES for taxidermists are now available!
WHITETAIL DESIGNER SYSTEMS offers our multi-step tanning system in kit form for the beginner or hobbyist that needs smaller quantities.
Kits are available through WHITETAIL DESIGNER SYSTEMS only and can be charged by phone. Toll free 1-877-861-5679.
HOBBY KIT
Contains 1 pint TAXIDERMIST'S LEATHERIZING ACID, 1 pint FAT·B·GONE, SHRINK-TONIC,1 pint CAM-L-C, pH papers and Instruction Guide. Enough for 3 average size whitetail capes or several small mammals!
$29.95 plus UPS shipping
DELUXE HOBBY KIT
Contains 1 pint STOP-ROT, 1 pint TAXIDERMIST'S LEATHERIZING ACID, 1 pint FAT·B·GONE, SHRINK-TONIC,1 pint CAM-L-C, pH papers and Instruction Guide. Enough for 3 average size whitetail capes or several small mammals!
$39.95 plus UPS shipping